About this project
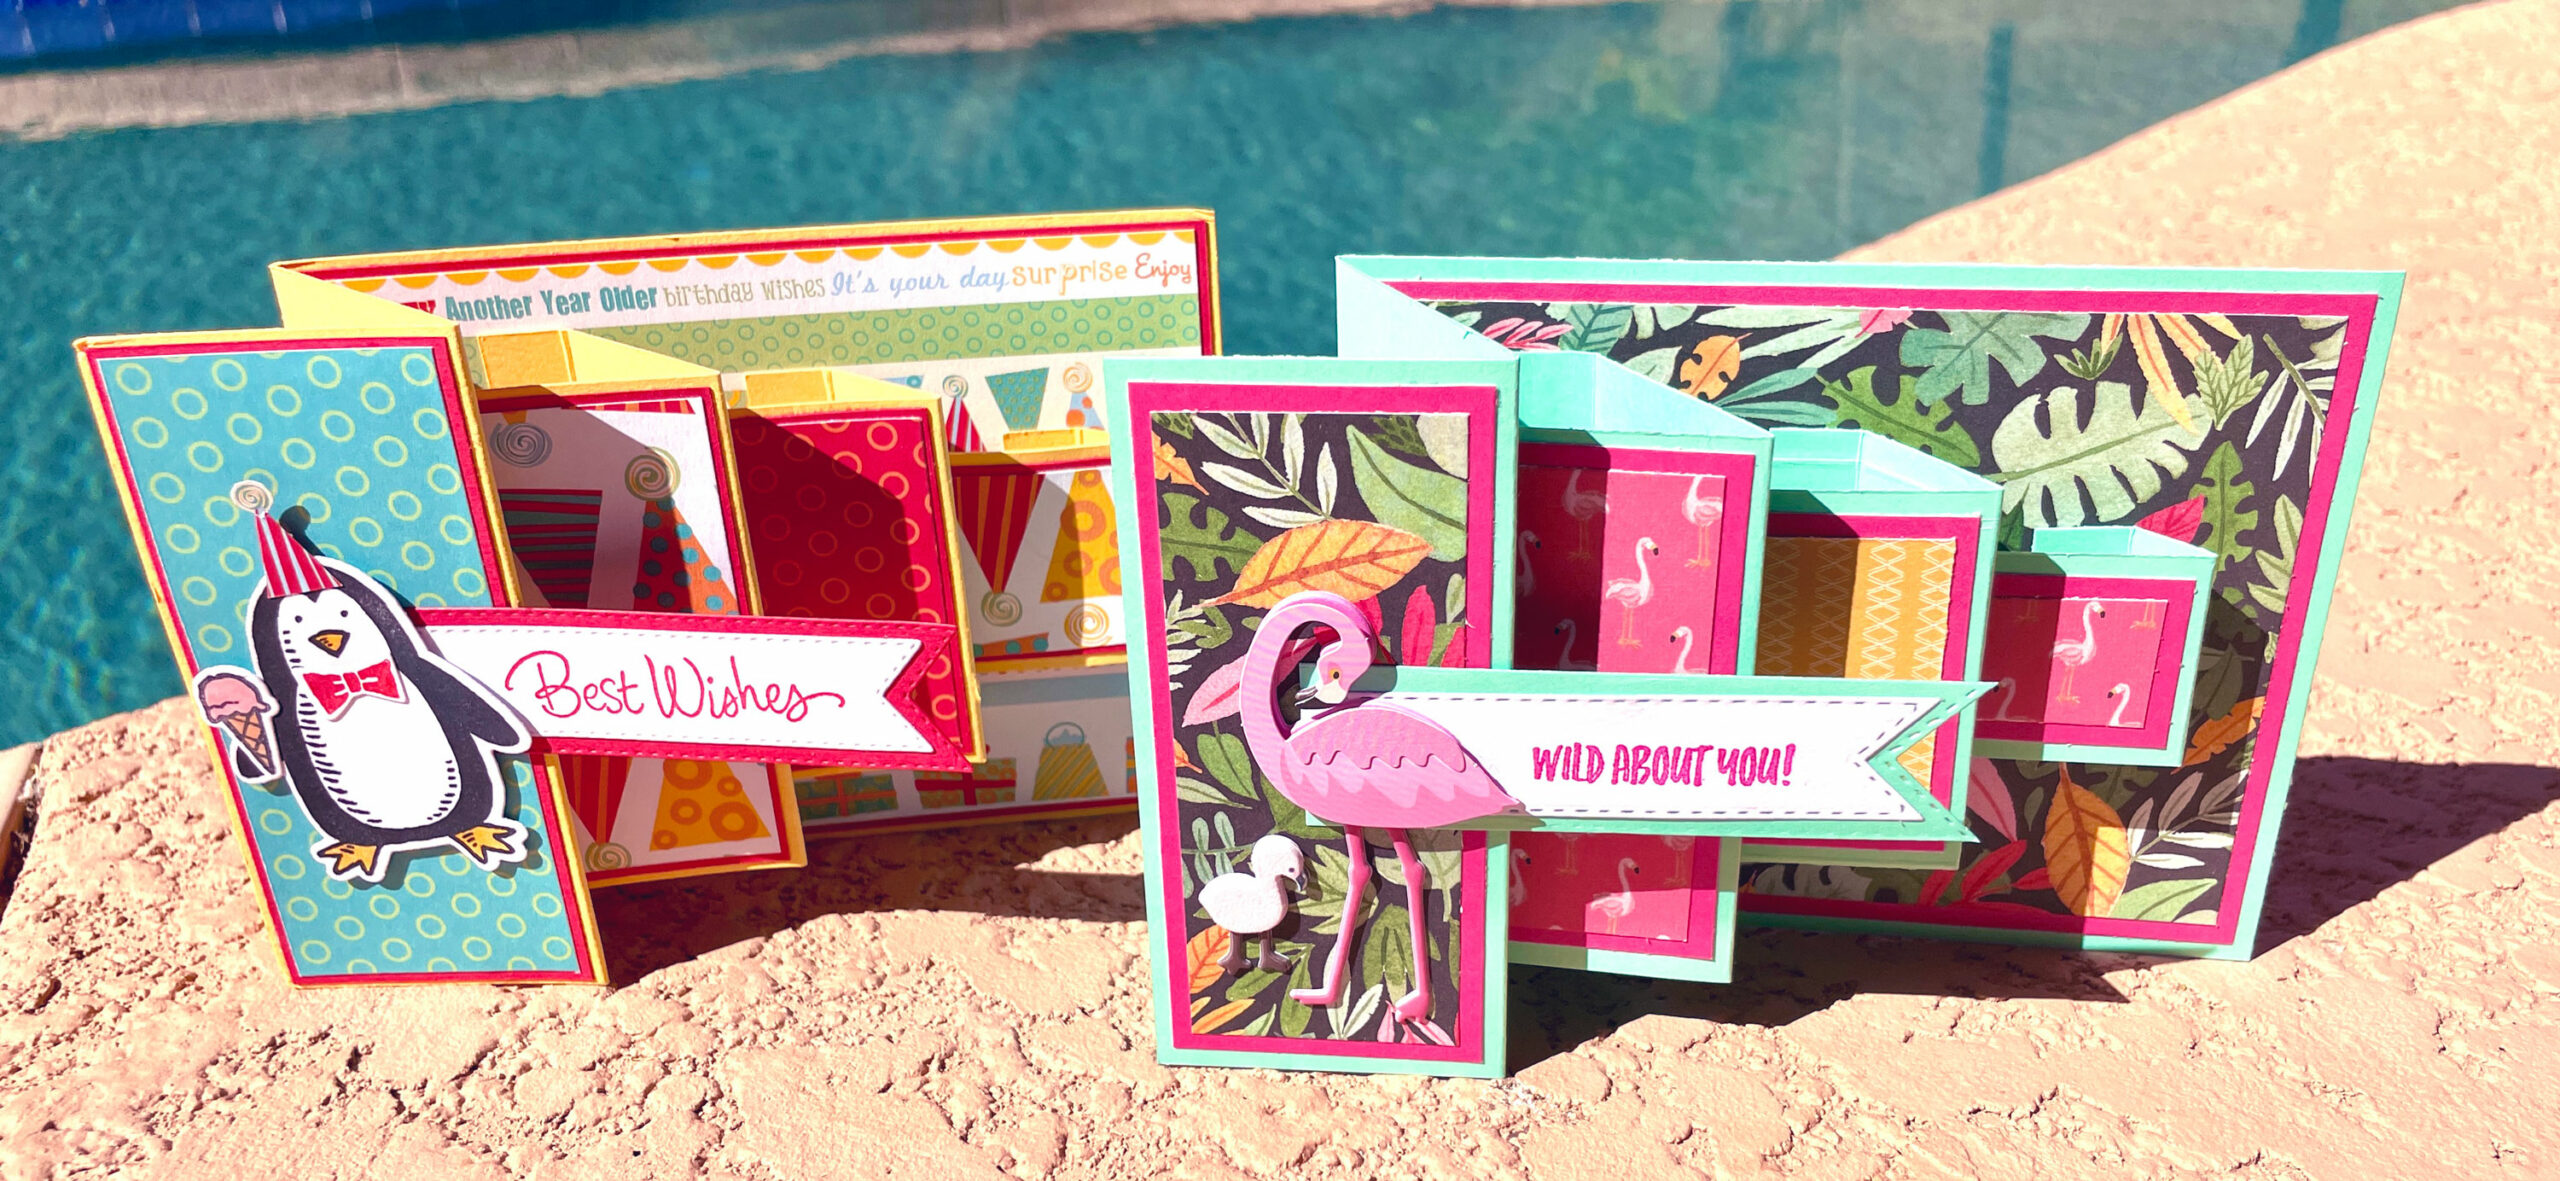
As part of a “Summer Camp” for friends in a Facebook card group I adore, I promised to share a demo of a cardmaking project. I had just invited my friend Kathy to join the group and was thinking back to some of the amazing cards she’s made me over the past several years, and I realized it might be fun to reverse-engineer a great penguin-themed birthday card from her (seen at left in the photo above).
So I measured and cut and measured and cut and came up with the summer-themed flamingo example at right, and was able to demo it in late May 2024 for the members of my group. I thought it might be helpful to share the instructions for them and for any other interested carders, and thus… this post!
Actual, official instructions
The aforementioned friend Kathy (who was able to attend the demo and crafted a card along with me!) helpfully was able to give me the information on what this card is “called” and the video she used to learn to make it herself!
It is a Z-Fold Block Pop-Up Card, and if you are someone who learns better by watching, this is an awesome video tutorial by MsPuff Creative Corner!
You might notice that some of her measurements are a little different than mine; feel free to experiment and see what you like best. And if you’d like to see the directions and measurements I gave during our demo, read on!
Prepping the paper
Card base (solid-colored cardstock)
- Cut to 9.5″ x 4.25″.
- Score and fold inward at 4″ on the longer side, then score and fold outward at 2″. (It should look kind of like an S from the top.)
Tapered boxes (same cardstock as base)
- Cut to 3.25″ x 5″.
- Score and fold on longer side at 1.5″, 3″, and 4.5″.
- Cut to 2.25″ x 4″.
- Score and fold on longer side at 1″, 2.5″, and 3.5″.
- Cut to 1.25″ x 3″.
- Score and fold on longer side at .5″, 2″, and 2.5″.
Background mats (solid-colored cardstock, a different color than the base and boxes)
- 5.25″ x 4″ (need two of these)
- 1.75″ x 4″
- 1.25″ x 3″
- 1.25″ x 2″
- 1.25″ x 1″
- 3.5″ x 1″
- This is for the front banner; you can also use the base cardstock color instead.
- You can hand-cut the end into a banner shape, or use a die to cut/emboss.
Decorative papers (coordinating, any weight of paper is fine; can use multiple designs)
- 5″ x 3.75″
- 1.5″ x 3.75″
- 1″ x 2.75″
- 1″ x 1.75″
- 1″ x .75″
Message sections (white or light-colored coordinating cardstock)
- 5″ x 3.75″
- 3.25″ x .75″
- This is for the front banner.
- You can hand-cut the end into banner shape, or use a die to cut/emboss.
Embellishments
- Larger decoration for front of card
- Sentiment for back of card
- Sentiment for banner
Instructions and tips
- Cut all papers to sizes listed above.
- Attach all decorative papers to their respective mats, centered.
- Attach the largest decorative-paper-and-mat pair to the inside of the base, centered.
- Attach the second-largest paper-and-mat pair to the front of the card, centered.
- Attach the three smallest paper-and-mat pairs to the appropriate base cardstock boxes, centered.
- Hold each of the four-section boxes so that the skinniest section is vertical at right. In this orientation, the matted pair should go on the second section from the left.
- Attach a strong adhesive to the leftmost and rightmost sides of the largest of the tapered boxes.
- I recommend Skor-Tape or similar; glue will be hard for this.
- Attach the left side first by centering it vertically on the blank inside section of the card base. The edge should go all the way to the back of the card.
- Press down firmly to attach that side.
- Before pressing down the right side, fold the card and box fully flat. Then push down to affix the smallest section of the box to the back of the card base.
- Unfold – your box should pop up into an almost-perfect square when looking from the top!
- Repeat the step above for the other two tapered boxes.
- Stamp and/or print the sentiments on the matted banner for the front and the matted pair (with white cardstock) that will go on back of card.
- Attach the left side of the banner no more than halfway over the front of the card, and embellish the front to cover the edge as appropriate.
- Add a message along with the sentiment on the last unattached matted pair if desired, then attach to back of card.
Voila!
And that’s it! You’ve made a fun dimensional Z-Fold Block Pop-Up Card that folds pretty flat for mailing but pops up with great texture!